Difference between revisions of "Alkalinity reduction with slaked lime"
(→How to treat brewing water with lime) |
|||
| Line 127: | Line 127: | ||
To measure the salt and lime amounts a ''scale'' with a resolution of 0.1 g or better is needed. | To measure the salt and lime amounts a ''scale'' with a resolution of 0.1 g or better is needed. | ||
| − | |||
| − | |||
| − | |||
| − | |||
| − | |||
| − | |||
| − | |||
| − | |||
| − | |||
| − | |||
| − | |||
| − | |||
| − | |||
| − | |||
| − | |||
| − | |||
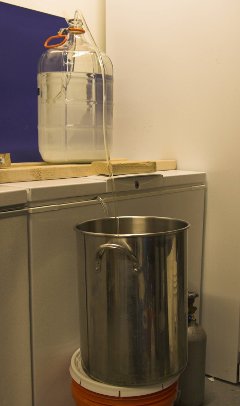
= How to treat brewing water with lime = | = How to treat brewing water with lime = | ||
| Line 176: | Line 160: | ||
* You can safely leave the precipitate (chalk) and residual water in this vessel for the next time you treat water. In this case you won't have to add additional chalk | * You can safely leave the precipitate (chalk) and residual water in this vessel for the next time you treat water. In this case you won't have to add additional chalk | ||
* To create water with a residual alkalinity between your tap water and the lowest alkalinity possible with your lime treatment simply mix the two waters rather than trying to precipitate less chalk. Some experimentation with this is in order. | * To create water with a residual alkalinity between your tap water and the lowest alkalinity possible with your lime treatment simply mix the two waters rather than trying to precipitate less chalk. Some experimentation with this is in order. | ||
| + | |||
| + | = Testing the amount of lime actually needed = | ||
| + | |||
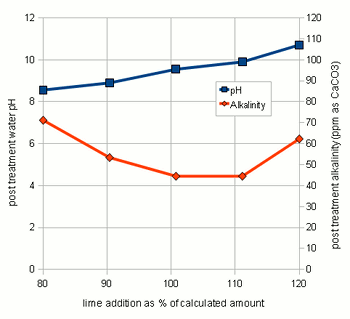
| + | [[Image:Lime_treatment_experiments.gif|right|frame|Figure 10 - The alkalinity and pH of water treated with lime. The x-axis represents the lime added as percent of the calculated concentration]] | ||
| + | |||
| + | Through experiments I found that the amount of lime calculated by the spread sheet is not necessarily the optimal amount that gives the best alkalinity reduction. This might be the result of inaccuracies in the water analysis data and simplifications that were made for calculations. As a result it is recommended to test the lime amounts in a small series of experiments were varying amounts of lime are added to the water and the alkalinity of the resulting water is tested. | ||
| + | |||
| + | Conducting these experiments is fairly straight forward. Take the pre-treatment water and add salts to match the concentration of salts that you plan to your brewing water. In addition to these salts add some chalk to the water. This chalk will not dissolve but provides nucleation sites for the chalk that will precipitate from the water later. Don't add lime at this point. | ||
| + | |||
| + | Then divide this water amoung 3 glass jars (Mason jars, beakers or small erlenmeyer flasks work well) giving each jar the same amount of water. Now calculate the amount of lime needed to precipitate all alkalinity in these small water samples. 85% of that amount is added to the first sample, 100% is added to the 2nd sample and 115% is added to the 3rd sample. Since the amounts added are rather small it is advantagous to prepare 5% by weight lime milk by simply mixing 10g lime with 90g water (tap water will work just fine). Once brought to an even suspsion the amount lime can be measured with a pipette (1 ml = 0.05 g lime) or by weighing the solution (1g = 0.05g lime) | ||
| + | |||
| + | After the lime has been added mix the samples thoughroughly and let the precipitate settle over night. | ||
| + | |||
| + | Then test the clear water for alkalinity (KH) and, if possible, for pH. I did this for 5 different samples and the results are shown in Figure 3. As the amount of added lime is increased, the remaining alkalinity drops until a minimum is reached. After that no more additional alkalinity can be precipitated. The rise in alkalinity after that point stems from the sharp increase of hydroxyl (OH<sup>-</sup>) ions which is reflected by the rise in pH. Those residual hydroxyl ions didn't find any bicarbionate ions or carbonic acid to react with. | ||
| + | |||
| + | The lime comcentration that lead to the lowest alkalinity and an acceptable water pH (<9.5) should be used for the treatment of the water at hand. | ||
= detailed calculation for determining the necessary lime additions = | = detailed calculation for determining the necessary lime additions = | ||
This section is intended for brewers who want to incorporate the lime treatment option into their own spreadsheet. It details the calculations that are necessary and is thus only for brewers wo want to know about that detail of the subject. | This section is intended for brewers who want to incorporate the lime treatment option into their own spreadsheet. It details the calculations that are necessary and is thus only for brewers wo want to know about that detail of the subject. | ||
| + | |||
| + | = Water treatment in a commercial brewery = | ||
| + | |||
| + | |||
= Final remarks = | = Final remarks = | ||
Revision as of 03:35, 12 March 2010
|
High alkalinity in their brewing water keeps many home brewers from being able to brew lighter beers. To overcome this obstacle home brewers would use reverse osmosis water to dilute their brewing water or even build their brewing water from scratch through the addition of salts. Another option is the use of acids to neutralize some or all of the water's alkalinity. If most or all of the water's alkalinity is the result of temporary hardness (dissolved calcium and magnesium carbonate) another options exists which is commonly overlooked: alkalinity precipitation using lime. Due to its low cost this method of brewing water treatment is widely used in the brewing industry but home brewers appear to have largely stayed away from it due a lack of understanding of the chemistry behind it and missing support in brewing water calculators. Based on A.J. deLange's work [deLange] and through pointers in technical brewing literature [Narziss&Back,2009] I was able to get it to work in my brewery and add support for the necessary calculations to the water calculation spreadsheet (Kaiser_water_calculator.xls). The following article attempts to shed light on this process and provide a better understanding of the chemistry behind it which hopefully allows other brewers to get this to work with their water in their brewery. Contents
A unintuitive conceptMost brewing books mention that the alkalinity of brewing water can be lowered by the addition of a lime (calcium hydroxide) which itself is a strong alkali. This always confused me and it took a while until the chemistry behind this process became clear. To better understand the chemica process described here the reader should have read An Overview of pH as well as About chalk and the carbonate system. Calcium hydroxide is a strong base and as such it completely dissociates into calcium and hydroxide when it dissolves in water:
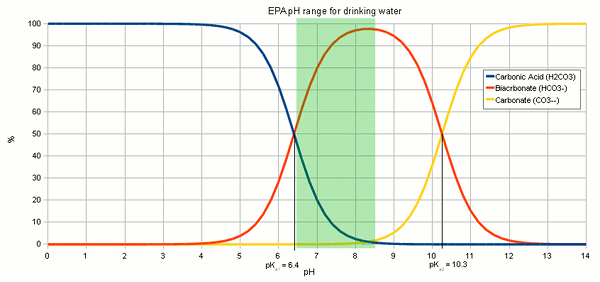
The resulting hydroxide ions (OH-) want to raise the pH of the solution and in pure water will be able to that very effectively. Hoever, the water we are treating with lime contain bicarbonate and carbonic acids with act as a pH buffer and stand in the way of a dramatic pH rise. While we have experienced alkalinity only as a hinderence for lowering the pH of the mash a pH buffer works both ways. I.e. it keeps the pH from falling as much as as it keeps it from rising. Since the ratio of carbonic acid, bicarbonate and carbonate stands in close relation to the pH of the solution (Figure 1) the hydroxide ions from the lime need to react with the carbonic acid (H2CO3), carbon dioxide (CO2 that hasn't formed carbonic acid yet) and bicarbonate (HCO-3) to increase the concentration of carbonate (CO2-3) through the following reactions
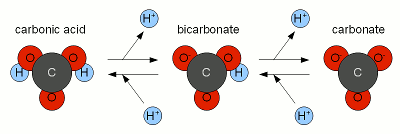
The added hydroxide basically sucking the Hydrogen ions (H+) from both the carbonic acid and bicarbonate to covert them to carbonate. This corresponds to traversing to the right in Figure 2. At some point most of the hydroxide ions have been consumed by aforementioned reactions and the carbonic acid/bicarbonate/carbonate balance is such that it is biased heavily towards carbonate. This went along with a rise in pH since the relationship between pH and carbonic acid/bicarbonate/carbonate, which is shown in Figure 1, has to remain satisfied. But what matters is not the risen pH but the increased concentration of carbonate ions. This is when we have to look at the solubility equation for calcium carbonate which has already been mentioned in About chalk and the carbonate system:
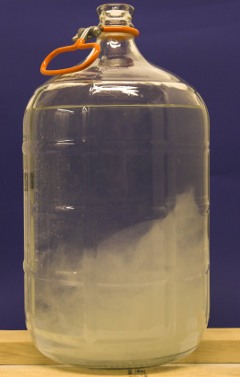
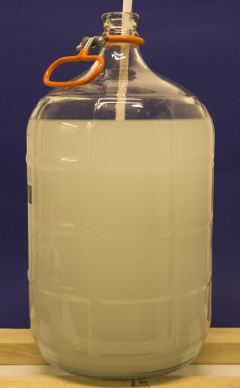
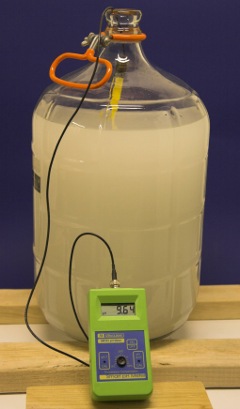
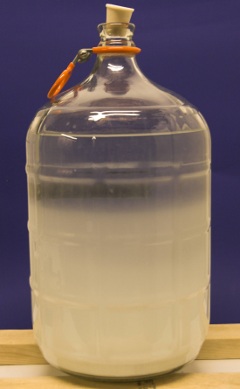
If the product between the concentration of calcium and carbonate ions is greater than 3.36×10⁻⁹, which is a very small number, calcium carbonate will precipitate out of solution until either the calcium concentration or the carbonate concentration is low enough to satisfy this equation. When this happens a milky white haze forms which will slowly settle.
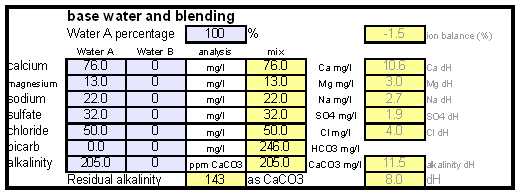
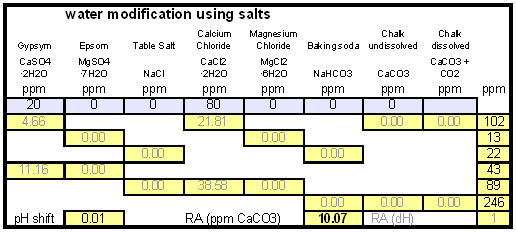
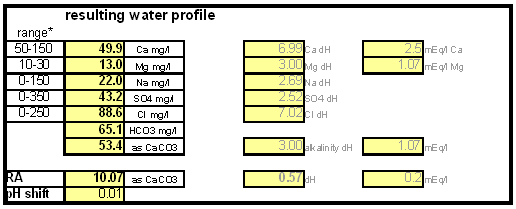
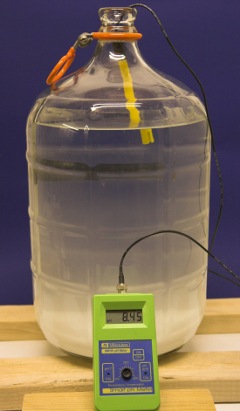
The down arrow (\u2193) means that the formed chalk is precipitating. This precipitating chalk represents the temporary hardness of the water and the clear water that remains has a lower alkalinity than it had before LimitationsThis kind of water treatment can only reduce alkalinity if sufficient calcium is present since it relies on the formation of calcium carbonate. Though changes can be made to the procedure (see #Magnesium reduction) the amount of magesium that can be removed with this method is limited due to the fact that magnesium carbonate is about 100 times more soluble than calcium carbonate [uri.edu]. Sodium cannot be reduced with this method since sodium carbonate is very soluble in water. What cannot be reduced either are sulfate and chloride anions. Those whill remain unchanged unless more are added though the addition of calcium salts, a pratice that is commonnly used to boost the water's calcium content and ensure an adequate calcium concentration in the treated water. Since alkalinity is only precipitated to the same extend that alkalinity is precipitated it is important that the calcium hardness exceeds the alkalinity. Calcium hardness is just another way of expressing the calcium content of the water. Rather then using the weight of the calcium, which is done when using ppm or mg/l as unit, the calcium content is represented as an equivalent amount of CaCO3 for example. To convert the calcium content from mg/l or ppm to ppm as CaCO3 simply multiply with 2.5. Eaxmple: The water contains 100 ppm calcium and has an alkalinity of 200 ppm as CaCO3. How much calcium remains after all alkalinity has been precipitated? The calcium hardness of that water is 250 ppm as CaCO3. Removing 200 ppm worth of alkality in the form of precipitated chalk also requires that the calcium hardness is reduced by 200 ppm. The remaining calcium hardness is 50 ppm as CaCO3 or 20 mg/l. Because of the calcum precipitation it might be necessary to supplement the water with calcium using calcium carbonate or gypsum. This is best done before or together with the addition of the lime. The amount needed depends on the expected calcium precipitation and the targeted calcium level of the post-treatment water. All of the calcium that is added by the lime will also be precipitated in the form of calcium carbonate. In pratice this method is not able to completely reduce the alkalinity to 0 regardless of the amount of calcium that is present on the water. The practical lower limit of alkalinity reduction is 30-50 ppm as CaCO3. One reason for that is absorption of atmospheric CO2 during the settling time which causes some of the precipitating chalk to be dissolved again. How to use the spreadsheetTo make water treatment with lime work, the necessary amount of lime need to be calculated. The calculations involved are explained in later but I expect that many will take the easier route and use the water treatment spread sheet. The pre-treatment waterThe calculations for lime are done on the "advanced" sheet of the spreadsheet. The first step is entering the water profile of the starting water. This can be taken from a full analysis or a GH&KH water test. In my case I have a full analysis of my well water which is very similar to Munich water. It has a high temporary hardness, something that shows itself though the precipitation of chalk whenever this water is boiled. Lime needed and calcium balanceNow jump ahead to the "water treatment with lime" section. Here the curent water pH and the water amount to be treated need to be specified. The pH of the water is used to detmine how much carbonic acid and CO2 are present in the water. This is necessary since the added lime also needs to convert that to carbonate in addition to converting the bicarbonate to carbonate. The water amount to be treated is different from the total brewing water amount specified later since some water is left behind to seperate the precipitate from the treated water. The result of the calculation is the theoretical lime amount, as ppm or mg/l, that needs to be added. But the more important result that needs attention here is the calcium surplus. This is the amount of calcium that would remain in the water if all alkalinity is precipitated with this process. If that concentration is below 10 ppm you need to add some calcium salks (Gypsum or Calcium Chloride) to boost the calcium content of the water. In my case I had to do that which will be explained in the next section. There are two more fields that require values GH and KH. These are measurements from a GH&KH water test test which were taken from the treated water after the chalk has been precipitated. Since the alkalinity rediction is rarely 100% effective, testing the post treatment water and using this information along with information from the pre-treatment water is a more reliable approach than assuming an abritrary efficiency of the lime treatment. For determining the final water profile it is assumed that lime treatment only precipitated alkalinity (i.e. bicarbonates and carbonates) and calcium. All other ions remain unafected. Addition of saltsJumping back to the "water modification using salts" section. As mentioned earlier, my water contains more alkalinity than calcium hardness which limits the efficiency of the alkalinity removal and causes a calcium deficiency in the final water. To avoid this I decided to boost the water's calcium level with 20 ppm gypsum and 80 ppm calcium chloride. This raised the calcium as well as the sulfate and chloride levels of the water. The new concetrations can be seen on the right most column. Salt and lime amounts needs for water treatmentWhen treating water with lime you'll be adding the necessary salts and lime at the same to a water amount that is larger than what is needed for brewing. That's why there is a seperate section labeled "necessary salt additions for lime treatment" which calculates the salt amounts based on the salt and lime concentrations ad well as the water amount specified earlier. It is unlilely that you want to add baking soda or chalk to the water when alkalinity removal is the goal. Which is why the list of salts is limited to gypsum, epsom salt, table salt, calcium chloride and magnesium chloride. The amount of lime needed is given both as the amount of teh dry power or a 5% (by weight) solution. The latter is useful for the treatment of small water amounts for test batches which will be explained later. Resulting water profileOnce GH and KH values for the post-treatment water have been entered in the "water treatment with lime" section, the resulting water profile is available. You'll notice that only calcium and bicarbonate/alkalinity changed. As mentioned before this is because it is assumed that only calcium carbonate was precipitated which is a valid assumption since the precipitation of magnesium is more difficult. Through this lime treatment the residual aklalinity has been lowered from 143 ppm as CaCO3 to 10 ppm as CaCO3 Mash pH estimationOnce strike water, grist weight and beer color are specified the mash pH can be estimated. In my case a 11 SRM Maibock was brewed and the estimated mash pH of 5.4 was close enough to the actual mash pH of 5.5. The pH estimation is less accurate when most of the color is coming from base malts which was the case for that grist What is neededTo efficienctly treat water with lime you'll need a few supplied some of which may already available. Food grade calcium hydroxide, a.k.a. slacked lime, hydrated lime, can be found in the canning section of many grocery stores under the name pickling lime. If your local stores don't carry it you can always oder it from on-line merchants. A 1lb bag will last you al long time.
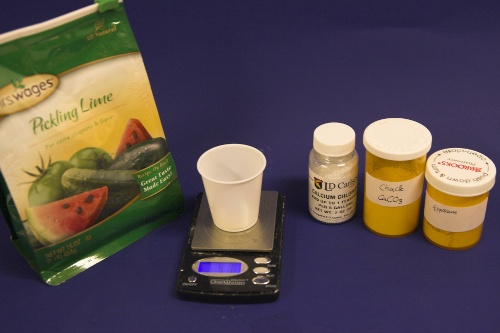
Though technically not necessay, a GH&KH water test kit is a very useful tool since it allow you to check the results of the water treatment instantly. Without a means of measuring alkalinity you'll have to wait until you can measure the mash pH to confirm that the water treatment was successful. A large vessel for treating the brewing water and letting the precipitate settle is also needed. To measure the salt and lime amounts a scale with a resolution of 0.1 g or better is needed.
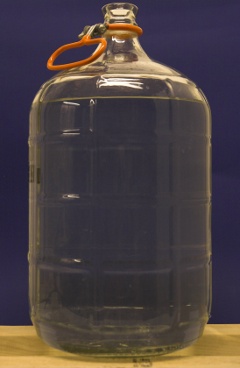
How to treat brewing water with limeIf you are planing to use this technique in your brewery on a regular basis here are some tips:
Testing the amount of lime actually neededThrough experiments I found that the amount of lime calculated by the spread sheet is not necessarily the optimal amount that gives the best alkalinity reduction. This might be the result of inaccuracies in the water analysis data and simplifications that were made for calculations. As a result it is recommended to test the lime amounts in a small series of experiments were varying amounts of lime are added to the water and the alkalinity of the resulting water is tested. Conducting these experiments is fairly straight forward. Take the pre-treatment water and add salts to match the concentration of salts that you plan to your brewing water. In addition to these salts add some chalk to the water. This chalk will not dissolve but provides nucleation sites for the chalk that will precipitate from the water later. Don't add lime at this point. Then divide this water amoung 3 glass jars (Mason jars, beakers or small erlenmeyer flasks work well) giving each jar the same amount of water. Now calculate the amount of lime needed to precipitate all alkalinity in these small water samples. 85% of that amount is added to the first sample, 100% is added to the 2nd sample and 115% is added to the 3rd sample. Since the amounts added are rather small it is advantagous to prepare 5% by weight lime milk by simply mixing 10g lime with 90g water (tap water will work just fine). Once brought to an even suspsion the amount lime can be measured with a pipette (1 ml = 0.05 g lime) or by weighing the solution (1g = 0.05g lime) After the lime has been added mix the samples thoughroughly and let the precipitate settle over night. Then test the clear water for alkalinity (KH) and, if possible, for pH. I did this for 5 different samples and the results are shown in Figure 3. As the amount of added lime is increased, the remaining alkalinity drops until a minimum is reached. After that no more additional alkalinity can be precipitated. The rise in alkalinity after that point stems from the sharp increase of hydroxyl (OH-) ions which is reflected by the rise in pH. Those residual hydroxyl ions didn't find any bicarbionate ions or carbonic acid to react with. The lime comcentration that lead to the lowest alkalinity and an acceptable water pH (<9.5) should be used for the treatment of the water at hand. detailed calculation for determining the necessary lime additionsThis section is intended for brewers who want to incorporate the lime treatment option into their own spreadsheet. It details the calculations that are necessary and is thus only for brewers wo want to know about that detail of the subject. Water treatment in a commercial breweryFinal remarksThis particular water treatment method is very popular among large brewers who need to deal with high water hardness and alkalinty but it is rarely used among home brewers. I think the reson for that is clear to some extend: it is more complicated and less intuitive than treating water with acids, diluting it or even building brewing water from scratch. But it is certainly a process that can be made to work by the advanced home brewer and once established becomes standard procedure when brewing ligher beer styles that require softer water. Even if it doesn't become standard procedure some brewers may just want to give it a try just to say: been there, done that. References
|

