Improvised Fermentation Temperature Control

As luck will have it, both the freezer chests I have been using for lagering and primary fermentation are broken and I have to get new ones. They have been running well for more than 5 years and started failing within 2 months of each other.

Currently my basement is at ~14 C and fermentation control for ales is as simple as a heating pad and a temperature controller. The probe is strapped to the carboy or placed into the bucket with a thermowell. The heating pad is placed underneath the fermenter. But lagers are a bit more challenging since I need to get them below ambient temperature. After some thinking I came up with this setup that uses equipment I have available. I doubt that I’m the first one to do it that way and I think Basic Brewing’s Low Cost Lagering approach works like this:

Simple setup for fermentation control.

Simple setup for fermentation control.

The carboy sits in a tub of  water and a submersible utility pump (the same pump I use for my carboy washer) pumps water through my immersion chiller. That chiller sits in my mashtun filled with snow slush. The pump is controlled through a temp controller connected to a probe sitting in a glass thermowell which reaches into the water in the tub. This setup work very well for me but here are a few thoughts and concerns:

  • Don’t let the ice or snow melt completely. If the pup ends up running continuously, because the water is not cooled, it will actually warm the water through its own heat. Initially I had the ice in a plastic bucket and it melted pretty quickly. After putting it in the MLT I only have to top it off once a day. The MLT has the added benefit that I can easily drain the melt water.
  • Since I have stick-on thermometers on my carboys I can’t submerge them completely. Before fermentation starts this can cause  temperature stratification and result in the top of the beer starting fermentation a higher than intended temperature. Next time I’ll put the carboy into a large trash bag which should allow me to submerge the carboy more completely.

I drape the blue blanket to cover the whole set-up and keep out the light.


Travel Yeast Lab

A few years back I started bringing back the sediment from Weissbier bottles from trips to Germany in hope of finding live yeast. Unfortunately most of the Weissbier these days doesn’t rely on yeast for its cloudiness (protein haze does a much better job) and when yeast is added it is often dead. But a few breweries still do bottle fermentation (Flashengärung). Initially I ended up taking home a lot of sediment samples that don’t contain live yeast.

Furthermore, bringing a basic yeast lab (a few plates, slants, needle and lighter) would not be that difficult but explaining it at customs might. But here is what works for me these days:

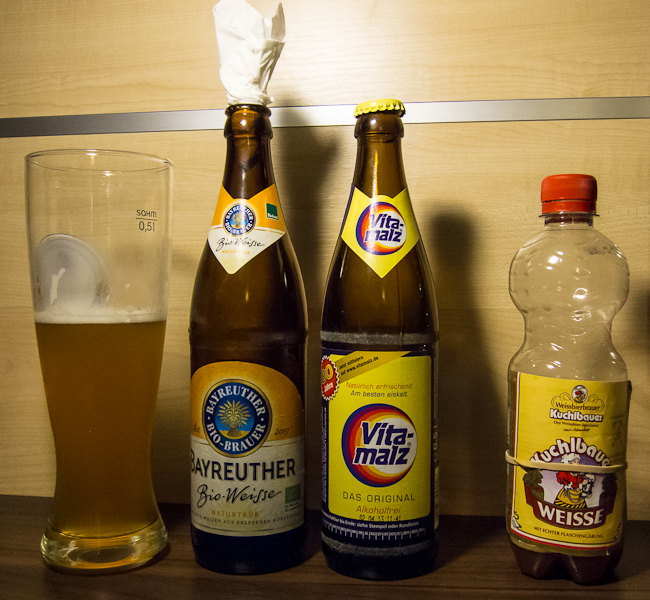
In German beer stores I look for Weissbier bottles that indicate Flashengärung on the label. It tends to be enough effort for the brewery that they want to reap marketing benefits from it. But you may also try Weissbier that doesn’t show this on the label. I then also buy a bottle of Karamalz or Vitamalz. This is carbonated malt beverage that will provide sterile wort for the test fermentation. The beer is decanted into a glass and some malt beer is added and shaken for some aeration. Plug the top with a napkin and let the fermentation start. It may take up to 3 days for signs of fermentation to show. If nothing happens or its starts to smell awful, there was no live yeast. If there is activity I recommend filling all or a small sample of the yeast into a small plastic bottle. Small water or juice bottles work fine as long as you didn’t drink from them. This is also the bottle in which the yeast can be brought home. A “dirty” bottle is much less conspicuous than a slant or plate of yeast. At home re-suspend the yeast with water and streak a sample on a plate to isolate single cell colonies. This will clean the sample of contaminants.

If you can’t keep the bottle upright for the initial days of testing, you may also fill some sediment and malt beer into the plastic bottle right away, seal it and test for pressure buildup regularly. Just make sure that there is not too much fermentable malt beer so the bottle can explode in your backpack.

Obviously this is not limited to German Weissbier, but would also work for other beers bottled with possibly interesting yeast.

From my last trip I was only able to bring home yeast from Kuchelbauer and Schneider Weisse.

Travel Yeast Lab

Images are back

I finally found the time to fix the images on the wiki. Most of them I was able to get back from a back-up. The rest I simply had to upload again from my disk at home. Let me know if you notice anything else broken.

Braukaiser Wiki Images

A few days ago I received a note that my site was hacked and used for a phishing scheme. I asked the support staff to remove the files, but apparently that did some damage to the images for the Wiki. I’ll look into fixing this. The site has been backed up, so I should not have a problem restoring the lost images.

Kai

Brewtus Interuptus

Last night I was finally able to brew again. I was done mashing and lautering the Weissbier wort when I pulled out my turkey fryer burner just to find out that it stopped working. Despite a full propane cylinder no propane would come out of the regulator and after tinkering with it for a while an deciding that this is not the kind of stuff I feel comfortable fixing myself I had to look for other options.

I was also 9:30. Not enough time to rush and buy a new burner and I was also not in the mood of starting a wood fire and boil the wort that way. So I decided to cool the wort down and put it into my fermentation chest where it will be sitting at ~0-4 C until I can resume brewing it, which will most likely be tomorrow.

Conversion progress in a single infusion mash

This was my contribution to the most recent Basic Brewing Radio / BYO listener experiment. It was also the first time that I was able to contribute.

When brewing my most recent KaIPA, I took iodine tests and mash gravity readings during the mashing process. The grist consisted of

  • 90% Bairds Pale Malt
  • 4% Weyermann CaraMunich I
  • 6% Weyermann Munich II

Mash temperature was 68 C at a mash thickness of 3.5 l/kg and a mash pH of 5.45. The mash was stirred before a sample was taken.

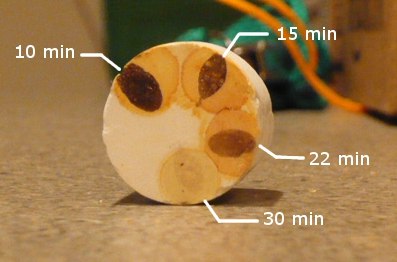
This is the progression of the iodine test:

At the 30 min mark I considered the iodine test negative.

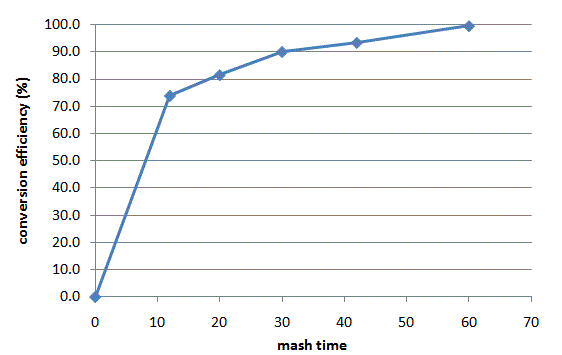
The progression of conversion efficiency looked like this:

After 30 min, when the iodine test was negative, only 90% of the extract potential of the grain had been released into the mash’s sweet wort. If I would have run-off at that point efficiency into the kettle would have suffered about 8-9% (conversion efficiency needs to multiplied with the lauter efficiency if efficiency into the kettle is needed). Mashing another 30 min gave me the additional 10% extract potential from the grain.

To what extent the attenuation was still changing after 30 min I don’t know. But I assume that there wasn’t much change happening due to the relatively high mash temp which denatures the beta-amylase more quickly.