
A big part of getting back into brewing has been a brewhouse upgrade from 5 to 10 gallons. Being able to brew 10 gal at a time means brewing less often but also changed my brewing process significantly.
My reverse osmosis system holds only about 5 gal water, which means brewing 10 gal batches requires water collection to start at least one day before brewday.
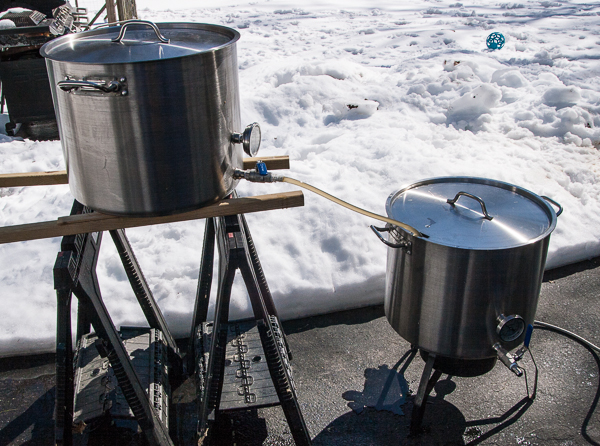
My current set-up consists of two 15 gal MoreBeer SS brew kettles. I liked the price and the wide bottom of these kettles. I don’t quite like how high the drain is off the bottom, but that can be mitigated. They also don’t have fill level markings and I need to use a calibrated dip stick for that.
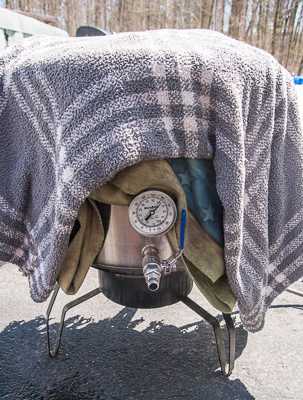
Mash rest with blankets for insulation
Just like a German 2 vessel brewhouse, one kettle is used as mash-tun/boil kettle and the other is the lautertun. Covered with a few blankets, a 15 gal mash holds its heat surprisingly well and direct firing the mash-tun allows for efficient temperature adjustment and step mashes. The thick bottom of the kettles greatly reduces the chance of burning the mash even if it is not constantly stirred. The drawback of this set-up is transferring the mash to the lauter-tun. The mash transfer requires scooping most of the mash out of the mash into the lauter tun and then pouring the rest once I’m able to lift the kettle.
Batch-sparging had to give way to fly-sparging. During the first batch I tried batch-sparging, but mixing sparge water into the grain over a false bottom with a huge dead-space, was just not working. It was impossible to get the mash well mixed and the grain. The sparge water is now carefully added in batches and allowed to percolate through the grain. The amount of sparge water is calculated to achieve the desired pre-boil kettle volume. For a while high drain position left a significant amount of wort behind. This was fixed with a barb on the inside and a hose that lays on the lautertun bottom.
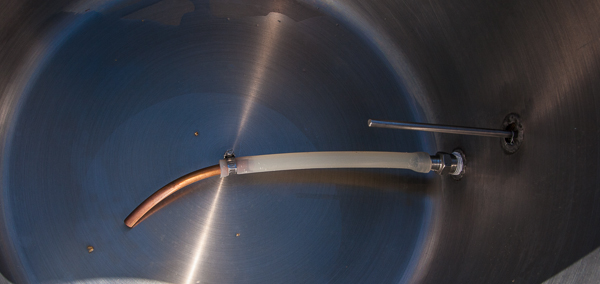
Hose on the inside of the lautertun to maximize wort collection.
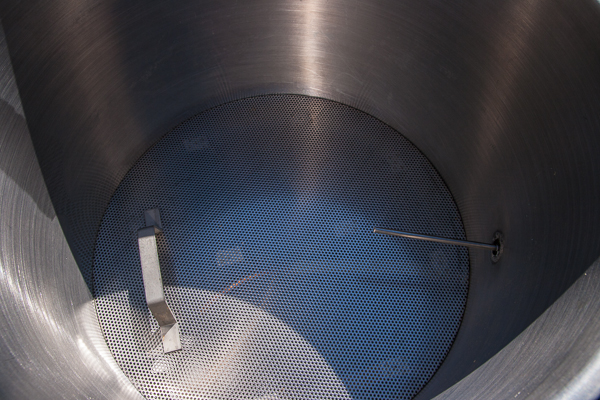
False bottom of the Morebeer 15 gal Brewkettle.
Lautering the mash.
I can easily get 90+% efficiency into the kettle for most beers, which means that sparging must happen evenly and it does not take much longer than running wort through the braided hose of my 5 gal cooler set-up.
The 5 gal brewing process relied heavily on the fact that I could lift the mash, set it aside and use the burner to heat sparge water. That is no longer possible and at least 2 burners are needed, A second burner heats the sparge water in a 15 gal Anvil kettle, which also serves as fermentation vessel.
Where there was an immersion chiller, there is now a plate chiller. An immersion chiller still works for 10 gal batches, but I always dreaded standing over the pot and moving the chiller around. The immersion chiller never brought the wort to pitching temperatures anyway. I needed to lift it into a large tub with ice water for the final chill. A single stage plate chiller doesn’t do that either for me and I’m a bit disappointed about the performance of the plate chiller though. With a reasonably slow wort-flow and a good amount of water the wort temperature drops to only about 40 C (100 F). To get to pitching temperatures I need to float a sanitized bowl or pot filled with ice in the wort.
The wort chilling set-up is sanitized by recirculating hot wort at the end of the boil for a few minutes. After that the wort keeps recirculating but with the water turned on and the wort is allowed to cool do about 90 C (195 F) before whirlpooling it. This lower whirlpool temperature provides less DMS formation and likely better retention of hop aroma for whirlpool hops. The high drain port meant that lots of wort was left behind in the kettle unless the kettle was tipped slightly towards the end. A small stainless steel elbow attached to the drain port from the inside of the kettle mitigated this problem without noticeable interference with the whirlpooling action. A whirlpool stand was not needed for immersion chilled 5 gal batch and adds about 20-30 min time. It does provide a welcome opportunity for late hop additions.
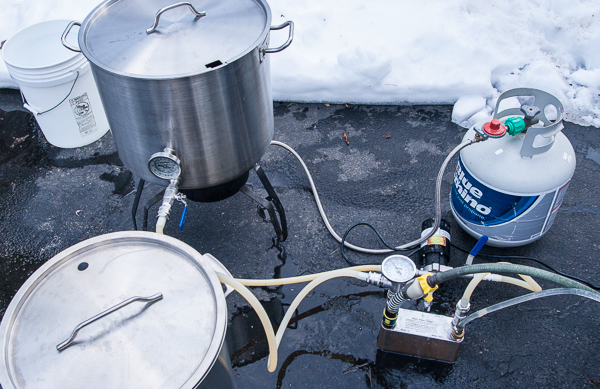
Wort chilling set-up with pump and plate chiller.
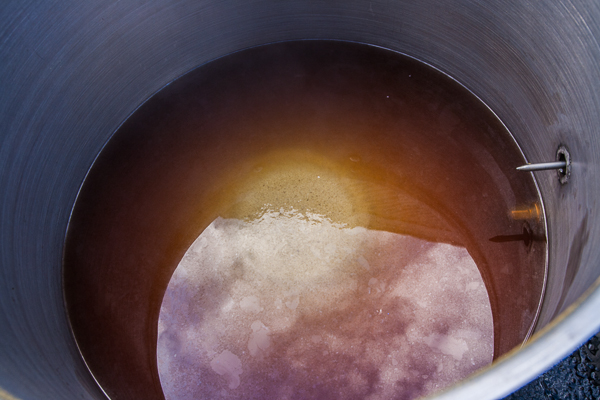
Trub cone in the boil kettle. To the left is the stainless steel elbow that is attached to the spigot from the inside.
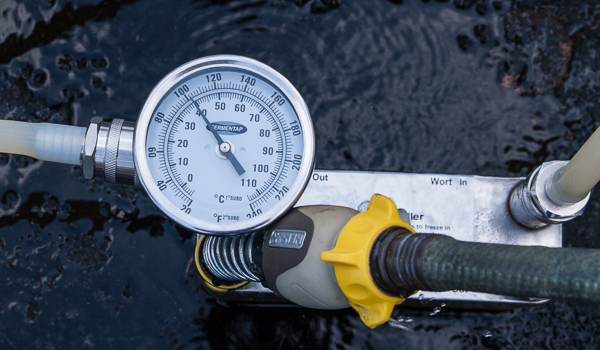
Even with moderate wort flow rate and lots of water, the wort temperature drop only to about 40 C (100 F).
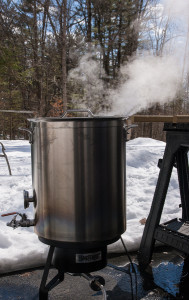
Steam sanitation of the HLT which is also used as fermentor.
The 15g Anvil kettle, that is used as fermentation vessel, is steam sanitized after it is no longer needed as HLT. Steam sanitation is very practical since it can easily kill microbes hiding in cracks of the spigot. But don’t forget about it, boil off all the water and ruin the kettle. Only about a liter of water (or even less) is needed to fill the kettle with 100 C (212 F) steam for about 5 – 10 min.
Having a kettle with spigot as primary fermentor allows for easy skimming of the kraeusen and makes transfer to kegs for secondary fermentation really easy No more starting a siphon. Just attach a hose and open the valve.
Brewing 10 gal batches means twice the amount of beer for one brewday, but not necessarily the same brew time. My 10 gal brewdays are taking longer than my 5 gal brewdays used to. Most of that is because 10 gal batches are slower to heat and transfer than 5 gal.

really cool to see you brewing again. What styles of beer have you been doing?
I have been doing quite a few IPAs and stouts recently. Both my freezer chests died and for 10G I’ll need to find something with more capacity anyway.
Brewing in San Antonio makes the chilling process much longer than elsewhere. In my last brewday, tap water was in the 75 degree range, so I used a prechiller copper coil in a cooler ice bath. The issue now is that someone has to move the prechiller and the immersion chiller simultaneously. This will get temps down to 70 but takes approx. 45 minutes for a 5 gallon batch. My next change may be a pond pump recirculating cold water to the immersion chiller and a chugger type pump circulating the wort through the immersion chiller.
Do you have issues cleaning your plate chiller? I’ve read people have had issues keeping it sanitary.
Yes, I find it difficult to get the chiller cleaned. It seems no matter how much water I flush through, some residue is always left behind. Getting the chiller sanitary is not an issue since heat does a good job. I’m just worried that it does not dry out fully and stuff can start growing in the chiller and lead to off-tastes.
As for your chilling problem. Have you thought of a 2 stage chilling where the 2nd stage would use a 2nd chiller through which you run ice water?
Your concern about things growing in the plate chiller is what I was thinking about.
I think what you described as a two stage chiller is what I’m using. I use one copper coil that runs through an ice bath which then runs to the copper chiller in the boil kettle.
So to update, I’ve successfully chilled my wart in a very short amount of time using a very simple setup now. I brewed on one of the hottest days down here (105-110) and had my wort down to 65 degrees in 35 minutes roughly.
My setup is simple, run copper coils (20 ft 3/8ID) in the wort to a submerged pond pump in a ice bath inside a cooler. I freeze about 4 gallons of ice in ice cream buckets and use an ice pick to break them up. Saves water, time and money! I can’t believe I’ve wasted so much time running water through a hose.
The chilling is all about heat differential between the coil and the wort. I’m in florida and the hose water is close to 80 degrees. My immersion chiller got me down to 120 from 212 in 10-15 min, but then another 45 min to get to 85 and that was about it. now when i hit 120 i turn off the hose and recirculate the water from a bucket of ice water. that gets me from 120 to 75 in about 10 more minutes. still a solid 20 minutes, but not as bad as before. I use a $10 submersible fish tank pump to run the ice water through the immersion chiller and back into the ice water bath. With all that snow in your pictures, chilling should be the least of your problems.
Mike, I was not using the snow to chill the wort because I would need a big bucket to recirculate ice water though the chiller. The tap water was between 40 and 50, so using ice water wold have only helped a bit, I think.
Have you thought about using a brew bag as a mash filter as well as an easy way to clean out the grains once transferred? We have found that it not only makes cleanup a breeze, but it also delivers clearer wort into the BK, among other things.
Thanks for the tip. I have not considered that. But I also don’t have a brewbag that I can use for this.
Hello Kai, I wanted to ask you, off-topic, why does the spreadsheet calculator keep into account also sparge water modifications.
As far as I understood, the water profile is fundamental in mashing (so I try to optimize it for the beer I do), but then for sparging it shouldn’t matter so much its composition (so i use my high-alcaline tap water), since it is just for “washing” grains.
Also, as far as I understood, all the buffer capability of water is overrun by the acid reaction of yeasts, making final beer of a similar ph, irrelevantly of the water alcalinity. Am I wrong?
Thank you in advance
Marco
I added that option so people can create the same water profiles for mashing and sparring in case they want to adhere to the Reinheitsgebot (Purity Law).
But I agree that when starting with RO water the most practical way is to add all treatment to the mash and sparge with RO water. That’s what I do these days as well.
Kai
I used to do a lot of 10 gallon batches but ended up switching back to 5 just so that I could have a bit more variety in the kegerator. What are you planning on brewing next Kai?
I may try a mash hopped Pale Ale next. I have lots of Cascade from my own plants in the freezer and want to use that. Maybe mash hop only to see how much carries over. If it does not work out, I may have to blend or use some pre-isomerized hop product.