Improvised Fermentation Temperature Control

As luck will have it, both the freezer chests I have been using for lagering and primary fermentation are broken and I have to get new ones. They have been running well for more than 5 years and started failing within 2 months of each other.

Currently my basement is at ~14 C and fermentation control for ales is as simple as a heating pad and a temperature controller. The probe is strapped to the carboy or placed into the bucket with a thermowell. The heating pad is placed underneath the fermenter. But lagers are a bit more challenging since I need to get them below ambient temperature. After some thinking I came up with this setup that uses equipment I have available. I doubt that I’m the first one to do it that way and I think Basic Brewing’s Low Cost Lagering approach works like this:

Simple setup for fermentation control.

Simple setup for fermentation control.

The carboy sits in a tub of  water and a submersible utility pump (the same pump I use for my carboy washer) pumps water through my immersion chiller. That chiller sits in my mashtun filled with snow slush. The pump is controlled through a temp controller connected to a probe sitting in a glass thermowell which reaches into the water in the tub. This setup work very well for me but here are a few thoughts and concerns:

  • Don’t let the ice or snow melt completely. If the pup ends up running continuously, because the water is not cooled, it will actually warm the water through its own heat. Initially I had the ice in a plastic bucket and it melted pretty quickly. After putting it in the MLT I only have to top it off once a day. The MLT has the added benefit that I can easily drain the melt water.
  • Since I have stick-on thermometers on my carboys I can’t submerge them completely. Before fermentation starts this can cause  temperature stratification and result in the top of the beer starting fermentation a higher than intended temperature. Next time I’ll put the carboy into a large trash bag which should allow me to submerge the carboy more completely.

I drape the blue blanket to cover the whole set-up and keep out the light.


Another Doppelbock and oxygen tasting experiment

I finally got around to taste 4 bottles of my last Doppeblock that were treated differently with respect to yeast and oxygen. All 4 were bottled on 8/18/12 straight from cold conditioning (which lasted about 2 month) using a picnic tap and short racking cane. At the time of tasting they had been in the bottle for 4 month and 2 weeks.

The bottles received this treatment:

  • “no yeast/no O2” – did not receive additional yeast or O2
  • “no yeast/O2” – got a shot of O2 in the headspace shortly before capping
  • “yeast/no O2”  – received about 0.5 ml of WLP 830 yeast slurry and no O2
  • “yeast/O2”  – both yeast and a shot of O2

I did a tasting between  “no yeast/no O2”  and  “no yeast/O2” bottles 2 months ago. The results can be found here: Better Foam Stability Through Oxydation?. During that tasting I observed a distinct difference in foam stability that many readers contributed to a poorly cleaned glass. This time I made sure that the glasses were perfectly clean. That meant soaking in diluted vinegar to remove lime stains, washing with dish sop and a RO water rinse.


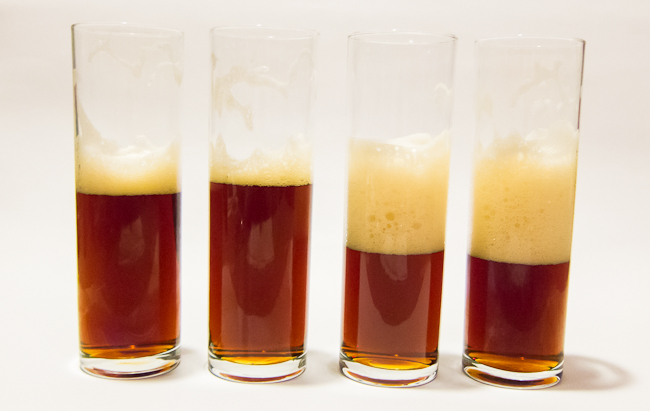
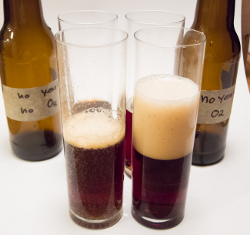
The 4 beers that were tasted. From left "no yeast/no O2", "no yeast/O2", "yeast/ no O2" "yeast/O2". The picture was taken during the foam stability test. The two samples on the right were poured 1 min after the samples on the left were poured.

The 4 beers that were tasted. From left “no yeast/no O2”, “no yeast/O2”, “yeast/ no O2” “yeast/O2”. The picture was taken during the foam stability test. The two samples on the right were poured 1 min after the samples on the left were poured.

Here are my tasting notes. When I refer to “dark beer aroma/taste” I mean the type of aroma/taste one gets from a good Doppelbock. Think of dried fruit mixed with black currant. I’m also listing pH, refractometer reading in Brix (I didn’t feel like taking hydrometer readings and the foam stability number* )

  • #1 – “no yeast/no O2” –  nice “dark beer aroma”. The aroma intensity is about the same as #2. (pH = 4.72, 10.4 Bx, foam = 5:30 min)
  • #2 – “no yeast/O2” – I made a note that the aroma is slightly stronger than #1, but than I made an opposing note on #1. I cannot conclude that it was objectively stronger (pH = 4.72, 10.4 Bx, foam = 8:30 min)
  •  #3 – “yeast/ no O2” – noticeably higher carbonation that #1 and #2, noticeably less of the dark beer aroma/flavor that #1 and #2 exhibit. Thinner mouthfeel than #1 and #2 (pH = 4.72, 10.1 Bx, foam = 10+ min)
  • #4 – “yeast/O2” – noticeably higher carbonation that #1 and #2, slightly less aroma than #3 (not confirmed in blind tasting), similar taste to #3 (pH = 4.68, 10.0 Bx, foam 10+)

After this tasting I did a blind tasting where I poured 2 glasses of each beer, scrambled the total of 8 glasses and attempted to match them to their respective beers. This is the groups I ended up with

  • group 1: one of #1 and one of #2
  • group 2: one of #1 and one of #2
  • group 3: one of #3 and one of #4
  • group 4: one of #4 and one of #3

Discussion:

This experiment solidifies the theory that the presence of yeast slows the development of the typical Doppelbock flavor. It does not show that the addition of oxygen, which is presumed to be the cause of this flavor, enhances this flavor of the beer after 4.5 months of aging. After 2 months of aging there appeared to be a more noticeable difference  (see  Better Foam Stability Through Oxydation?) At 4 months the addition of Oxygen did not make as much of a difference as the presence of yeast. This became apparent in the blind tasting where I could not keep the O2/no O2 versions apart but was able to identify the yeast/no yeast versions.

In future batches I do want to expand this experiment to developing a time line that shows when the “Doppelbock” aroma starts appearing depending on treatment. Maybe it makes sense to add O2 to 1/3rd of the bottles, no O2 and no yeast to another 1/3rd and yeast to a 3rd. This may allow brewers to control when the flavor/aroma of a Doppelbock (or other strong dark beer) peaks. An aspect that is very important for competitions.

It also shows that the beer was not completely fermented. Hence the continued fermentation when yeast was present which lead to higher carbonation and a lower refractometer reading.


* when I determine foam stability I take a Koelsch glass and pour the beer straight down the middle until the foam reaches the top.  The foam stability number is the time it takes until the foam opens up and the surface of the beer can be seen. Anything above 7 min is really good. Below 4 min, there is a problem with the foam stability.

Incubator built

If possible I try to keep my brewing stuff out of the house and in the basement. But that has been challenging in the winter when it is only 15 C (60 F) and I’m trying to propagate ale yeast. What I needed to build was an temp controlled enclosure and I was planning this for a while but never got around to getting started until I saw a cabinet on the side of the road that would be perfect.

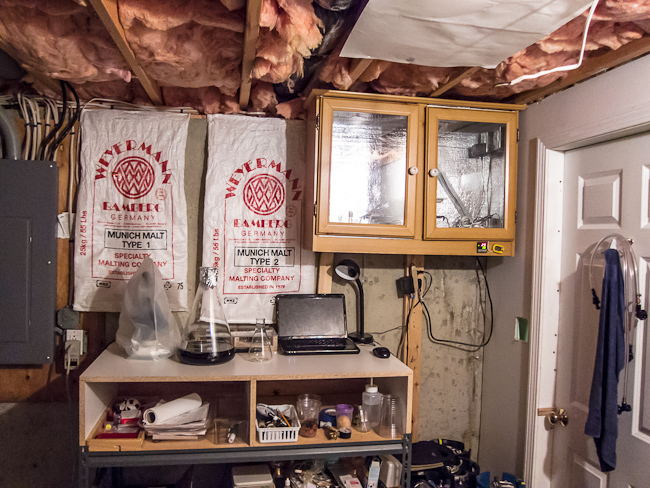
The completed incubator. It's hanging a bit high, but I wanted it out of the way since my fermentation room is not all that big.

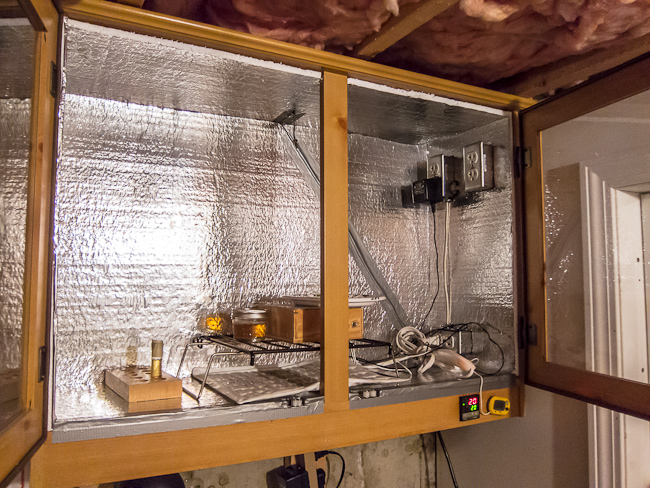
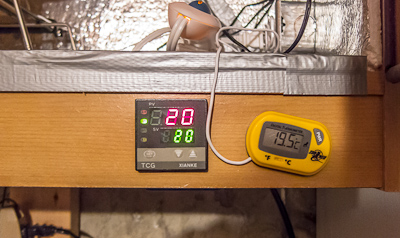
All I had to do is to cut off the base, line it with insulation, install a PID and outlets.  Two of which are controlled by the PID and the others are always on. I got the PID a while back on Ebay. It is holding the temperature steady but somehow the temp probe seems to be off by not only an offset but also by its slope. Unfortunately there is very little documentation on this unit. I simply added another digital thermometer to check the actual temperature.

The inside, showing the outlets and the heating pad

PID and back-up thermometer. I don' fully trust that the PID is showing the correct temperature. But it is holding the temperature steady.

Heat is provided by a heating pad that doesn’t have automatic shut-off. I plan to use two heating pads to cover the bottom once I found a suitable grate that keeps the flasks and stirrers suspended above the heating pads.

Interesting paper on dry hopping

A few days ago, on the Homebrewer’s Association forum, I came across a link to this Peter Wolfe’s thesis on dry hopping. As with most papers, there useful information could be found in both the discussion of existing knowledge and the experiments themselves. Here are a few things I took away from it:

1.3.1 Hop Essential Oils: Hops produce the monoterpene mycrene, one of the major hop aroma compounds, immediately in the young cones. Mycrene is the largest essential oil fraction (up to 70%). “As the cone ages oxygenated terpenes are formed followed by the synthesis of sequiterpenes. Mumulene and Caryophyllene are the doninat sequiterpens and are also the send and third largest constituent of the overall oil”. – This supports the idea that hop cones need to “ripen” in order to develop their full aroma potential. An aspect that is important to those of us who go our own hops.

1.3.3 Hop alpha and beta acids: Bitterness contribution through isomerized alpha acids does not exist in dry hopping due to the lack of isomerization. In their unizomerized form alpha acids are not expected to add to the perceived bitterness based on work that has been done. My experience has been that hop pellets to taste bitter but that may also be due to the extremely high density of alpha acids compared to beer. Later it is mentioned that polyphenols extracted from the vegetal matter may add to perceived bitterness by themselves and synergistically with iso-alpha acids.

1.3.5 Glycosides: these are the combination of hop oils with a sugar molecule. Glycosides are less volatile than the hop oils themselves and thus provide the hop plant with a means of transport and storage. In brewing glycosides are extracted during boiling and survive that boil better than the essential oils. Hydrolysis of the glycosidic bond is know to occur in beer and most likely the low pH environment is the cause. Once the clycosdic bond is broken the essential hop oil is freed and able to contribute to hop aroma. In my brewing I commonly observe more hop aroma in the finished beer than what was present in the wort.

1.3.6 Biotransformed hop compounds: It has been shown that yeast activity is able to change hop aroma compounds. This changes the dry hopping character depending on when the hops are added to the fermenter.

1.6.1 Packaging and its potential ability to scalp dry-hop flavor: “The hydrophobic nature of hop aroma compounds makes them vulnerable to adsorption and absorption by hydrophobic polymers”. The most common occurrence of this is in cap liners. The extent depends on the type of polymer. In one study mycrene and humulene were found to have completely migrated into the cap liners of examined retail beers. This is an interesting aspect to those of us who bottle beers and don’t pay much attention to the type of bottle cap we are using.

2.3.3 Long Term Dry Hop Aroma Extraction: In long term experiments a model solution of 6% ethanol in water buffered to a pH of 4.2 was dry hopped and the linanol and mycrene content was measured on day 1, 4 and 7.  The solution was not agitated. The amount of these compounds dissolved did not increase over time. It actually decreased which suggests that the maxium extraction is reached after one day of dry hopping.

2.3.4 Short Term Dry Hop Aroma Extraction experiments were performed in shaken flaks and showed that the maxium concentration of mycrene and linanol is already reached after 240 minutes. This supports the idea that aroma extraction in dry hopping happens much faster than brewers think. Although it is mentioned that temperature can play an important role and that extraction at lower temperatures is expected to be slower. In general more hop oils were extracted from pellets compared to whole flowers of the same batch of hops. This is contributed to the fact that in pellet processing the hop material, including lupulin glands, is crushed.

Some of the aroma compounds were stable while others showed a decline even during the exanimated extraction times.

Brewery trials

Brewery trials were performed in conicals equipped with a pump that circulates the beer. All yeast was removed before dry hopping.

The trials showed that beer agitation (pumping) significantly improved hop aroma extraction. This was observed in the overall hop aroma of the beers and the measured hop oil levels. Again, pellets lead to more hop aroma extraction compared to whole cones. When whole hop cones were used extraction was also slower and reached its max not until around day 6. Polyphenol extraction was also higher with hop pellets compared to whole cone hops.

Hop drying at home

Recently I gave a pack of my homegrown hops to a friend of mine who regularly brews at a Deja Brew, a Brew on Premise place in Shrewsbury Mass. The quality of the hops, including the fact that they retained their fresh green color, was especially noted by the owner who commonly sees customers with poorly dried and stored home grown hops. So I decided to outline my process here. While this process may be standard operating procedure for most of my regular readers there might still be a few pieces of new information here and there.

When to pick

Hops grown in he Northeast are generally ready to pick towards the end of August. What I’m looking for are well developed lupulin glands, the yellow grains at the base of the cone’s leaves, a distinct fresh hop aroma when rubbed between palms and a papery/springy feel when the cone is squeezed. A few cones may already have brown tips on their leaves. The time window for picking them might be 1 to 2 weeks.

It is important that hops are not picked too early since, just like fruit, hop cones ripen and develop some of their characteristic flavor later in their life. This includes the synthesis of sesquiterpenes Humulenne and Caryophyllene, which are the 2nd and 3rd largest constituent of the hop oil. The major constituent, mycrene, is already produced in young cones.  1)

When I’m ready to pick cones I don’t pick them selectively. I generally cut off pieces of the bine, as hop “vines” are called, starting from the top so I can stop when enough cones were picked. All cones are generally picked within a week.
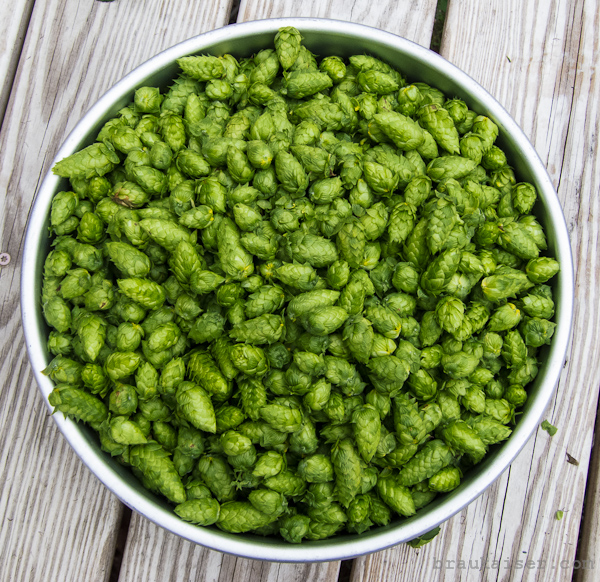
Freshly picked hops

How to dry

In order to prevent rotting, the picked hops need to be dried immediately. And when it comes to hop drying, we home hop growers actually have an advantage over commercial growers. This advantage lies in the ability to dry hops with ambient air temperature. Some of the hop oils we are trying to preserve have flash points around 100 F (40 C) and the application of heat during drying would volatilize and drive them off 2). In fact I seem to be getting better and different aromas from my home grown Cascade compared to store bought Cascade.

In my opinion, drying is best done using a dedicated oast. Some brewers dry hops in the oven, which I don’t recommend due to the high temperatures. Others spread the hops on window screens. I don’t like that option since it takes up lots of space.

The hop oast I built is very simple. It consists of racks build from 2x4s and window screen that can be stacked on top of each other and placed on top of a window box fan. The fan blows air through the hops from the bottom and I place the least dry batch on the top and the most dry batch on the bottom. Since the air is forced through the hops they can be packed more tightly and the whole contraption does not take up much space. A batch of hops dries within 3 days in that oast.

Hops are dry enough once you can squeeze a handful and they do not feel damp anymore. In addition to that the stem should easily snap. This is the part that takes the longest to dry.
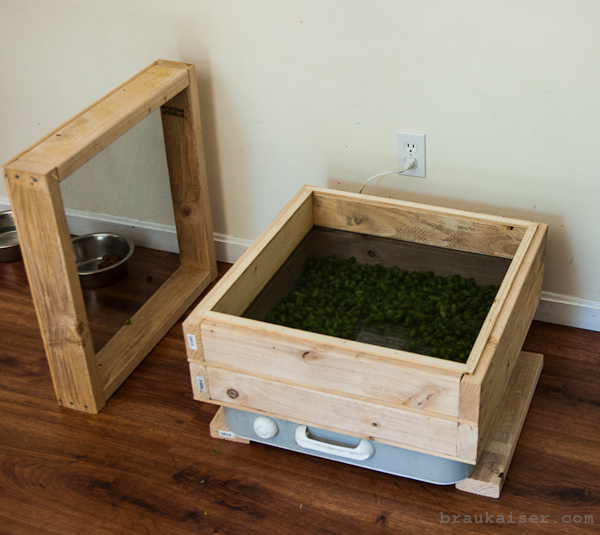
simple oast for efficient hop drying

Packaging and storage
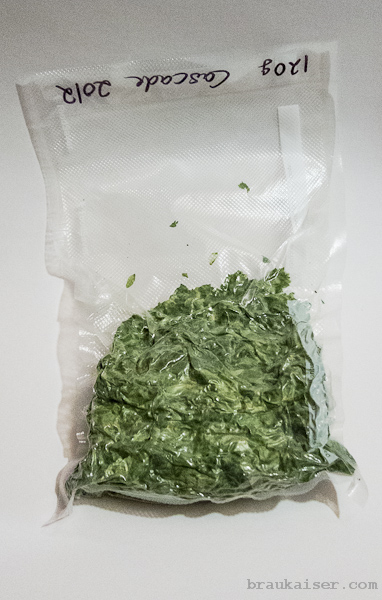
Vacuum packed dried hops

Hops are best stores in a vacuum sealed package. I highly recommend the investment into a vacuum sealer like the FoodSaver line of products. Oxygen is the main enemy of hops and while a vacuum sealer does not eliminate oxygen it greatly reduces oxygen during hop storage. I generally make 120 g (4 oz)  packs of hops.  It’s useful to make the hop bag larger than it needs to be for two reasons. First, it makes it easier to stuff the rather bulky dried hop coned into the bag and second, the bag can easily be vacuum packed and re-sealed once opened. I also recommend labeling the hops bag an the end that will not be cut off and not like it is done in the picture on the right.

Hops should be stored in the freezer since the low temperatures slow staling reactions. This also keeps them out of the light.

If you follow these recommendations you will see that the quality and shelf life of your home grown hops is on par or better compared to store bought hops.

Due to the unknown of the actual alpha acid content, home grown hops are best used as late hop additions for for dry hopping.

Update:

A few weeks after writing this I listened to a great Basic Brewing Radio interview with Dan Dettmers of Gorst Valley Hops. Look for the September 27, 2012 eposide in the 2012 list of episodes.

References:

1) Peter Wolfe, A Study of Factors Affecting the Extraction of Flavor when Dry Hopping, 2012

2) Joseph Wegner, Gorst Valley Hops, The Science Behind the Art: Hops in Brewing, presentation at the 2010 American Homebrewers Conference


ANHC 2012 – recap

I know I have been quiet for a while now but for a reason. I have been busy with experiments, brewing and building brewing related stuff. However I want to take the time to give an update on ANHC-three, the Australian home brewer’s conference held in Melbourne, Victoria past October.  First off, a big thanks to the organizing committee to that invited me to speak at the conference.

The actual conference lasted two days for me since I did not attend Industry Day (in hindsight I think I should have because it the program looked very interesting, but I toured Melbourne with my wife instead). I had presentations on both days and even though I did practice my presentations while commuting, I was a bit nervous. But any stage fright was quickly cured by samples of beer that were handed out during the presentation starting at 9:30a. I enjoyed that most presentations had beer samples. This is not as common at the US home brew conference.

My talks about lager brewing and wort fermentability control in mashing were very well received.

The only downside to the conference was that there were too many good topics and I had to make a few difficult choices between presentations being given at the same time. But luckily the presentations from the main auditorium have been recorded on video and will be available on DVD.

The creativity price for presentations goes to Stu McKinlay from Yeastie Boys for having a hand drawn slide deck.

Gala Dinner and Club Night were lots of fun, though staying up late was a challenge during the early days of the drip due to the considerable time difference of 9 hrs.

Club Night

Club Night

My wife and I spent and additional 2 days after the conference to drive along Great Ocean Road and take in its spectacular scenery. Now she want’s me to find a job there so we can move to Australia. But first I would have to pay a speeding ticket. $176 for going 106 km/h when the limit was 100 km/h. I thought I was obeying the speed limits all the time but had no idea even 6 km/h can get you a ticket. Ouch.

Southern Ocean and Victoria cost along the Great Ocean Road

Southern Ocean and Victoria cost along the Great Ocean Road

Brewer’s Friend

By now frequent visitors should have noticed the Brewer’s Friend links on the sidebar of the blog and the wiki. Brewer’s Friend is a cloud based recipe editor and set of brewing calculators. I have  been collaborating with Larry, the mastermind behind Brewer’s Friend, to include much of the brewing science and calculations I have been working on over the years. Having them in stand-alone spreadsheets is fine, but being able to use them in one integrated software solution is even better.

So far Brewer’s Friend has added support for Plato (since that’s what I’m using) and calculation of conversion efficiency. Check it out and stay tuned for more cool features.

Estimating yeast growth

Recently there has been a lot of focus on yeast growth calculators for starters. But most of the various calculators out there base their data on work published in Chris White and Jamil’s yeast book. Unfortunately the yeast growth example given in that book was only for a non agitated starter. When a starter is constantly stirred all the yeast is kept in suspension in a homogeneous nutrient environment. That is not true for non agitated starters where yeast will sediment and only evolution of CO2 will cause agitation. As a result stirred and still starters are expected to show different growth behavior that cannot be simply approximated by adding a constant scaling factor to yeast growth.

Jamil’s pitching rate calculator supports stirred starter fermentation but the growth curve used for that mode is a simple scaling of the growth curve for non agitated starters. Jamil never published how he arrived at the model used in his calculator. As a result I have to draw conclusions based on what I can observe when I run data points through his calculator.

Before I get into comparing growth curves, I need to explain how I look at yeast growth. The primary factor in yeast growth is the available sugar. Within a practical range of wort concentrations the actual concentration of wort will have little impact on yeast growth. I’m still going to test this in a controlled experiment but observations from yeast propagation in my brewing seem to support that. Because of that I focus not not how many Million yeast cells are in a ml of wort, but rather how many Billion yeast cells get to share a gram of extract (sugars, proteins, minerals, etc) that is dissolved in that wort.

As for yeast growth, I care about how many new cells of yeast can be grown from that gram of extract. In their yeast book Chris and Jamil use a yield factor defined as new yeast growth in Million/ml per degree Plato drop of apparent extract. This takes into account that different worts can have different attenuation levels and with it varying amounts of fermentable sugars. While this is correct it requires knowledge of the wort’s fermentability and most brewers don’t know the fermentability of their starter wort. Furthermore the uncertainty of starter wort fermentability is likely +/- 5 % and this is well within the imprecision that one can expect from yeast calculators. I expect yeast growth calculators to have an error of +/- 15% or more. Because of that I feel confident in using Billion cells growth per gram of extract (B/g) as the yeast growth metric that should be tracked. Assuming a starter attenuation of 75%, the conversion factor between  “yield factor” and specific growth (B/g) is 13.3:

1 B/g = 13.3 M/(ml*P)

Now that I established how I plot yeast growth I can show some charts.

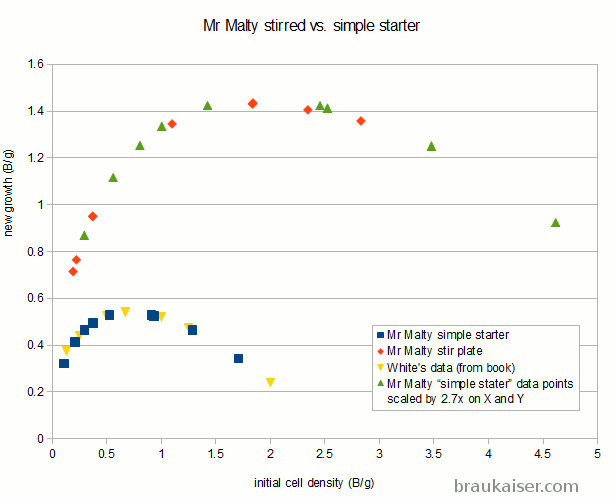
This one compared Mr Malty data for simple starters and stirred starters with the simple starter data from the Yeast book as well as a 2.7x scaled version of the simple starter data:

It is apparent that the growth curve for simple starter matches the data from the book, which makes sense. What surprises me, however, is that the stir plate data is not just scaling the yield for a given innoculation rate, but it also scales the inoculation rate. This means that the yeast growth calculator has different optimal innoculation rates for simple and stirred starters. That is something I don’t follow and my data contradicts that. More on that in a moment.

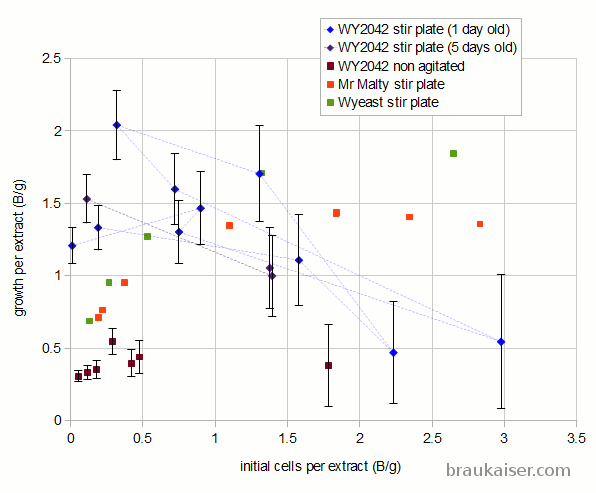
The following is a chart with my data. I have been using WY2042 since it is a low flocculant lager strain. Most of that has been presented in a previous blog post (Yeast growth experiments – some early results). What’s new is the non agitated data points and a few data points for using yeast that was stored in the fridge for 5 days before being used.

When the data is potted as growth in billion cells per gram over initial billion cells per gram, the data makes more sense. As the amount of extract available to each cell of the starting population approaches the amount of extract needed to grow a new cell, the growth per extract starts to fall. This is because the initial population is in a resting state and when sugar becomes available all vital yeast cells start to consume the sugar. A cell will not start budding unless it consumed all the resources needed to grow a new cell. If this was an ideal culture, where every cell consumes sugar at the same rate and needs the same amount of sugar to grow a daughter cell, cell growth would stop once there are more cells per gram of extract that it takes to grow the same amount of cells. This is because none of the cells would have access to the amount of nutrients needed to grow a new cell. But this is not such an ideal culture and some cells will consume nutrients faster than others and will be able to grow daughters while others can’t.

I also expect that yeast growth of a large population of older cells is reduced compared to young cells since the old cells will need to fill their reserves before they can start accumulating nutrients for growth. I don’t have enough data on that yet to quantify this effect.

This effect of dropping yeast yield is not as pronounced for a non agitated culture. This is because in such a culture not all yeast cells have the same access to wort nutrients due to sedimentation. Yet another reason why one cannot estimate the yeast growth characteristics in a stirred starter from a non agitated starter.

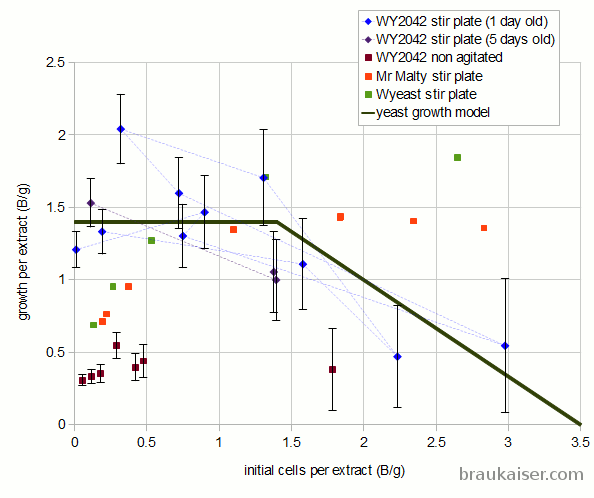
Based on my observations and knowledge of yeast growth so far, I think the following yeast growth model should be used for calculating expected yeast growth in stirred starters:

If (initial cells < 1.4 Billion/gram extract)
  yeast growth is 1.4 Billion / gram extract
If (initial cells between 1.4 and 3.5 Billion / gram extract)
  yeast growth is 2.33 - 0.67 * Billion initial cells per gram extract
else
  no yeast growth

For non agitated starters a growth rate of 0.4 Billion per gram should be assumed over the full initial cell density range (0 – 3.5 B/g). I don’t think that starters with more than 3.5 Billion cells/g  are practical. I expect the growth rate in starters to be affected by the shape of the vessel, the volume of the wort and more. The 0.4 Billion new cells per gram proposed here is a rough guess based on the data points I have so far.

Update:

The proposed model for stirred starters has been implemented in:


Better Foamstability Through Oxidation?

Oxidation experiments, again. This time on the latest batch of Doppelbock. Frequent readers may have seen the earlier posts on the subject of oxidation during Doppelbock aging: The effect of yeast on the flavor development of Doppelbocks and Follow-up on the Doppelbock yeast vs. no yeast in bottle experiment in which I tasted the same batch of Doppelbock with and without added yeast. This year I not only bottle some of the Doppelbock with yeast, but two bottles also has pure O2 added to the head space.

Last night I tasted a version bottled normally and one where I purged the head space with O2. The intend of the O2 in the head space was to see if it speeds up the aging process. Both beers were carbonated at bottling time and free of yeast. This tasting was 2 months after the beer was bottled and 6 1/2 moths after it was brewed.

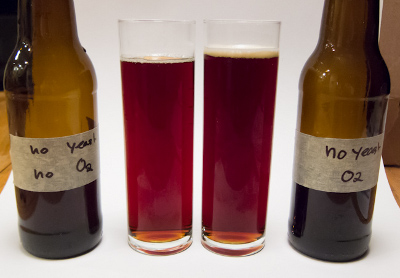
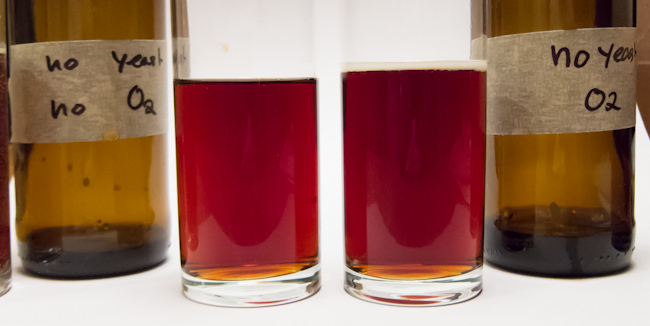
comparing the color. bottled without oxygen (left) vs. bottled with oxygen (right)

The oxygenated version had a darker color as can be seen on the image on the left hand side and below. This color in crease is a known effect of oxidation and I have also observed this when I oxygenated and force aged a Pilsner. The increased color in the picture was not just because the oxygenated beer had a closed foam cover.

A better picture for comparing color.

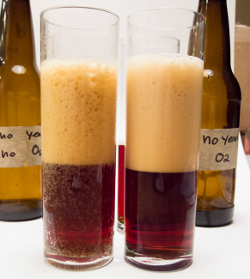
But the biggest surprise was the incredibly poor head retention of the normal beer. It annoyed me during attempts to take a good picture for comparing color since the foam cover would quickly break open while it stayed close on the oxygenated beer. The shadow of the foam skews the color and darkness of the beer.

So I took another set of glasses and performed my standard foam stability test where I pour beer straight down the middle until foam reaches the top. I did this for both beers and waited for the foam to settle.

Foam stability test. Note the coarse bubbles on the non-oxygenated beer.

Foam stability test only one minute later.

The non-oxygenated beer clearly showed very coarse foam that collapsed quickly. Generally it would take 7 – 10 min between pouring and opening of the foam cover to show beer surface. But for the non oxygen beer it took just about 2 minutes. That was very surprising and I have no explanation for that. An internet search for foam stability and oxidation did not reveal any useful leads. It is certainly possible that something else, other than oxidation, was to blame for the poor head retention. I do have another normal vs. oxygenated pair and plan to taste this in a few weeks along with a bottle to which I added yeast.

As for taste, the normal beer did have a slight “dark malt” aroma. It’s bitterness was rather sharp and lingered a bit. The oxygenated version had notes of black currant (common oxidation aroma) and a slightly more pronounced “dark malt” aroma. It did not taste like cardboard or sherry. It had more of the desirable Doppelbock character than the non oxygen version and I would consider it definitely the better beer of the two. It won in both, taste and appearance.

Conclusion:

The stark difference in foam stability is interesting and will require attention in subsequent samplings of this beer. The accelerated aging of the oxygen beer was expected. I was just surprised that the beer did not taste oxidized given the fact that it was actually bottled with a head space full of O2. Dark beers are known to withstand oxygen better due to the antioxidative properties of melanoidins.

Update:

I took one of the non O2 beers and a carefully cleaned glass and repeated the foam stability test again. This time the foam did not fall that quickly, but it still showed unusually large bubbles. There is a good chance that the glass I used for the test was not clean enough and skewed the results. I’ll try this again when tasting the other bottle with added O2.

Tasting of the enzyme beers

I finally got to taste the experimental beers that were treated with enzymes to fix an unexpectedly low attenuation limit (see Enzymes in the Fermenter).

This was after the beers were allowed to carbonate at room temperature for about 10 days. After that they were stored at about 10 C (50 F) for about 3 weeks.

The control, which had only water added to correct the  OE (original extract) to the same level as the others, had a very full mouthfeel. It did not taste sugary sweet but had a distinct full mouthfeel which did come with some increased sweetness, though. At time of tasting this beer had an apparent attenuation of 76% (final extract was 4.2 Plato)

The beer, to which enzymatic malt extract was added, did not open with a loud “plop”, but did gush and poured with lots of foaming. Looks like there was some additional fermentation in the bottle. The beer had a very nice light body that did not show alcohol hotness or seemed too thin. At time of tasting this beer had an apparent attenuation of 90% (final extract was 1.8 Plato)

The beer which had Beano added did also gush out of the bottle after opening and also poured with a lot of foam. It tasted even lighter than the beer with enzymatic malt extract. But it made the beer thinner than it should be. There were also some sharp alcohol notes, but I would not characterize it as “rocket fuel” either. At time of tasting this beer had an apparent attenuation of a whopping 96% (final extract was 0.8 Plato)

Here are the stats:


control malt extract Beano
corrected starting extract 17.8 17.7 17.7 Plato
Extract 4.2 1.8 0.8 Plato
ADF 76.4% 89.8% 95.5%
Alcohol 7.2% 8.5% 9.0% w/w
pH 4.4 4.37 4.34

Conclusion:

The ezymatic malt extract worked very well for this beer. It did not spoil the beer as one would fear when adding non-boiled wort. It also did not go as far as Beano treatment which leaves sufficient residual body. Beano’s glucoamylase seems to be able to break more dextrins than the enzymes that were present in the malt extract.

Going forward I plan to employ enzymatic malt extract treatment in the fermenter on a full size batch. This would work well for a double IPA or an imperial Pilsner.