I finally found the time to fix the images on the wiki. Most of them I was able to get back from a back-up. The rest I simply had to upload again from my disk at home. Let me know if you notice anything else broken.
Braukaiser Wiki Images
A few days ago I received a note that my site was hacked and used for a phishing scheme. I asked the support staff to remove the files, but apparently that did some damage to the images for the Wiki. I’ll look into fixing this. The site has been backed up, so I should not have a problem restoring the lost images.
Kai
Not Again !!!
Getting back into brewing seems to be plagued with all sorts of obstacles. This time I ran out of propane before getting the wort to a boil. And yes, it was at night again and I was far from being in the mood for a midnight propane run.
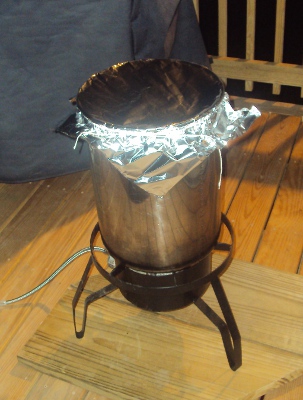
But this time I got the wort up to 98 C, which is hot enough to pasteurize it and I decided to go a different route – the no chill approach. While the wort was still hot I covered it with aluminum foil:
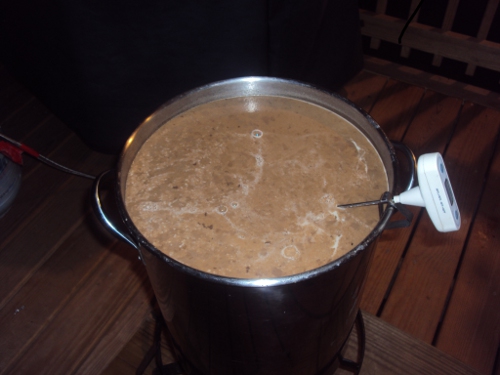
The wort sat this way over night on the deck and I moved it into the house in the morning. After 24 hrs the temperature dropped to 32C. During that time the pH fell from 5.27 to 5.14. I’m not sure if this is sign of an infection, but it smelled just fine. So I brought it to a boil. A lot of coagulation already happened in the hot wort and an oddly brown layer of trub developed during heating:
Other than that the boil seems to be going as normal.
Brewtus Interuptus
Last night I was finally able to brew again. I was done mashing and lautering the Weissbier wort when I pulled out my turkey fryer burner just to find out that it stopped working. Despite a full propane cylinder no propane would come out of the regulator and after tinkering with it for a while an deciding that this is not the kind of stuff I feel comfortable fixing myself I had to look for other options.
I was also 9:30. Not enough time to rush and buy a new burner and I was also not in the mood of starting a wood fire and boil the wort that way. So I decided to cool the wort down and put it into my fermentation chest where it will be sitting at ~0-4 C until I can resume brewing it, which will most likely be tomorrow.
Hop Juice
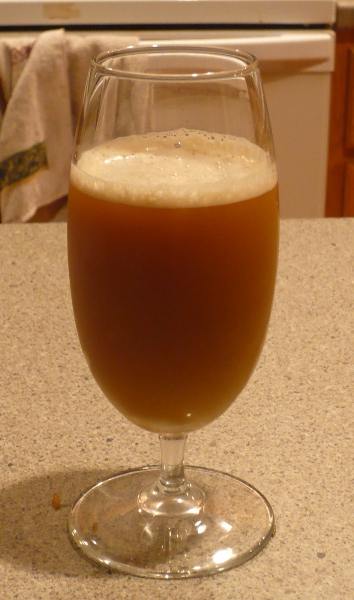 Could there be something stronger than the IPA (or KaIPA for this matter) itself?
Yes, the beer that can be squeezed from the spent dry hops. Something only a true brewing geek knows to enjoy. Besides being murky like the Ganges in the rainy season, the aroma is pronounced but not overpowering. The bitterness, however is much harsher than the actual beer. It particularily lingers in the back of the throat, which I don’t appreciate too much.
Prost
What happened?
Some of you may have wondered what happened to braukaiser.com between April 1st and April 6th. Well, I forgot to check the e-mail account associated with that domain and let my domain name expire. After the initial shock, which included the fear that I lost my rights to that name, I realized that it was simply a matter of paying the renewal fee and getting braukaiser.com to point to my hosting account again.
Everything should be running just fine again and I can also receive e-mails from my braukaiser.com account. This certainly taught me a lesson about staying on top of these administrative tasks.
Vienna Malt Mash pH Surprise
Last weekend I brewed my annual Maerzen using 75% Best Malz Vienna, 20% Weyermann Munich II and 5% CaraFoam. When designing the brewing water I went by my past experiences with a similar grain bills that used Weyermann Vienna and the surprise came when I tested the mash pH. Instead of the expected 5.5o I got 5.77. I’m generally not off by that much and was doubting the pH meter until I also tested the mash pH with colorpHast strips. During the decoction the pH fell to 5.71 and I added another 2 ml 88% lactic acid to bring it down to 5.58, which I considered ok for a Maerzen. The boil pH was later reduced as well with some lactic acid.
After testing the distilled water pH of this Vienna malt I found that is was way off from the pH one would expect from a base malt slightly darker than pilsner malt. It was 5.8. Below is a chart of the distilled water mash pH for various base malt samples that is taken from my mash pH paper:
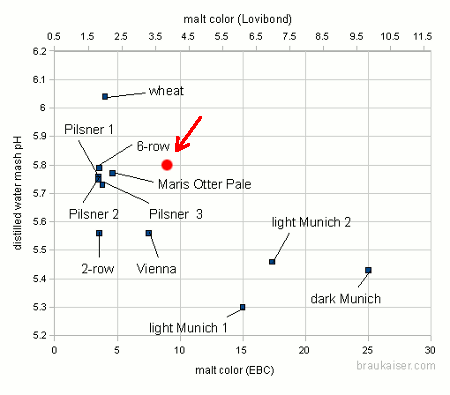 The pH is slightly higher than pale or pilsner malts and more than 0.2 pH higher than the Weyermann Vienna that I tested a while back. This goes to show that the color/pH correlation is even weaker than I thought and that one should not rely on the accuracy of color based mash pH estimations for grists that contain a mix of base malts. The color based mash pH prediction works much better for grists made of pale/pilsner base malt and a mix of specialty malts since the pH properties of the latter are more predictable.
More predictable was the amount of lactic acid that I had to add to lower the pH. With 0.32 ml per kg and 0.1 pH drop it was well within the 0.25-0.42 ml range that I show here.
The malt analysis sheet for this batch of malt reported a pH of 5.9 for the congress mash. While I noticed this I assumed that the pH of the congress mash, which is diluted to 8 l/kg towards the end, would not be that useful for predicting mash pH. In hindsight this could have been an indication for the higher than expected mash pH.
Does gelatenized starch contribute to the measured mash extract content?
This is a question I was not able to answer in a recent BBR interview: Do the starches, that are present in wort but are not converted yet, contribute to the extract content that is measured with a refractometer?
So I set out to test this in a quick experiment. I mixed 6.5 g corn starch with 116 g water and heated that in the microwave until it boiled. The result was a gooey mass of gelatinized starch. When I tested this paste with the refractometer the line was very blurry around about 5 Brix. The total starch content was 5.3 % by weight. Based on that it seems that gelatinized starch does change the refractive index of a solution.
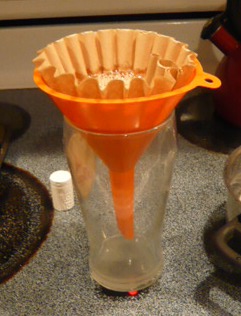
To get this solution more liquid and a clearer refractometer reading I had to add amylase enzymes. The easiest way to get them for a brewer is to make a cold malt extract. This means making a cold water mash and filtering it. The resulting wort had a extract content of about 1.6 Plato and I added 76g of this wort to the gooey starch mass which lowered its temp to ~60 C. Almost instantly the viscosity dropped and the solution became liquid.
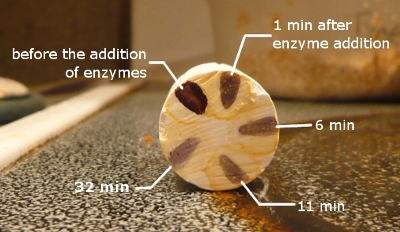
If you do the math the resulting solution contains has about 3.8 % w/w solids. Immediately after mixing the solution tested at 3.2 Brix but 6 min later it tested at 3.6 Brix, which is about 3.7-3.8 Plato and close enough to the expected extract content while still showing a positive, albeit reduced, iodine reaction. I did not wait for the iodine reaction to completely disappear.
This experiment shows that gelatinized starch also contributes to the mash extract that is measured with a refractometer.
The difference to an actual mash is that in an actual mash not all the starch is pulverized and immediately mixed with all the mash water as it was in this experiment. A lot of starch is inside grit particles and it takes time for this starch to be released into the sweet wort or to be converted inside the grit particles and for the resulting sugars and dextrins to diffuse into the wort. The starch present in the wort is converted within 20-30 min but there is a continued release of sugars into the wort which causes the increase in mash extract content that can be seen even after the iodine test is negative.
Brewing water spreadsheet update
 I decided to give my brewing water calculator a face lift and also add some new features that brewers were looking for. The face lift happened mostly on the “basic” page, which is now more intuitively grouped into the sections for
- base water
- mash and grist info
- salts and acids
- resulting water profile and mash pH prediction
These are other things I changed or added:
- changed the treatment of undissolved chalk such that it only contributes half its calcium since it contributes only half its alkalinity. Chalk’s solubility in mash seems to be limited and what does not dissolve and contribute to a rise in alkalinity should not contribute calcium ions either.
- salt additions can now be made in g and mg/l. You can select the unit
- the salts to be added can be reported in g and tsp. The latter is useful if your scale breaks down or you don’t own one yet.
- lactic acid and phosphoric acid are supported. Are there many brewers who are actually using hydrochloric or sulfuric acid? I may add support for those later.
- water boiling for alkalinity reduction has been added to the “advanced page”. This was easy to add since I already supported lime treatment
- pH shift estimation for the major water treatment steps
- salts can be added to all the water or strike water only. If they are only added to the strike water, the resulting water profile for the strike water or the overall water can be reported.
But a number of features remained the same:
- The basic and advanced pages are still there. Anything entered in the basic page will automatically carry over into the advanced page. The idea is to support a wide variety of users.
- the tall and narrow formatting remained in order to better support its use on mobile devices
- I avoided macros or the use of fancy functionality in hope that this spreadsheet can be supported by mobile devices
- the SRM based mash pH prediction is still there. Compared to some tests I’m running with grist based mash pH prediction, it does surprisingly well and is actually more accurate in most cases.
- support for SI and US units. Under the hood it uses SI units almost exclusively. There is a spreadsheet version that is preloaded with US units even though this changes only 2 fields.
The new Kaiser_water_calculator.xls can be found in the Ingredients section on my site.
If you find bugs or have suggestions for improvements let me know here or send e-mail to “kai at braukaiser dot com”.
Follow-up on the Doppelbock yeast vs. no yeast in bottle experiment
Some may remember the experiment where I added life yeast to a few bottles of last year’s Imperator, my Doppelbock. I posted the rather pronounced flavor difference when I tasted 2 bottles side-by side here.
Tonight, about 1 year after they have been bottled, I opened another pair of these bottles.
The beer from the non-yeasted bottle still has a pronounced dark fruit aroma whereas the beer from the yeasted bottle has a much more subdued aroma. It seems to be catching up since I remember even less aroma at the 6 month tasting. In this beer some of the roasted character is coming though which is overpowered by the other aromas in the non-yeasted beer.
Quite dramatic this time was the difference in head retention. While it took the yeasted beer only 6 min until the head collapsed to a thin layer of bubbles. The head of the non-yeasted beer lasted about 4 min longer. This could be attributed to the release of protease-A by the yeast. This enzyme is known to degrade head retention positive proteins in beer.
As for the difference in taste, it follows the difference in aroma. The non-yeasted beer has a decidedly fuller and more complex taste than the yeasted beer. Without having experienced the difference side-by-side I would consider the yeasted beer a great Doppelbock but it is not as good as the one that was bottled without the yeast.
Conclusion: I stand by my opinion that yeast gets in the way of the proper development of the flavor profile of a Doppelbock and brewers should avoid bottle conditioning this beer.


